Saturday, December 22, 2012

Re:Boutique, Part 2

Now, a peek at some of the stuff our Re:Boutique has for sale, and the artists who make them. And remember, the boutique is open whenever SCRAP is: every Thursday, noon-8; First Fridays, 5-9; Third Saturdays, 10-1. With additional hours as we pick up more volunteers! (Want to help make that happen AND get 20% off your SCRAP purchases? Start by signing up to attend one of our intro sessions.)
Ann Marie Koshuta [amkstudio (at) aol (dot) com] takes mismatched jewelry pieces, old clothing, and fashion design samples of all sorts, and incorporates them into wearable art accessories that get noticed. She makes her own felted fabric and even uses previously-steeped linen teabags, among other things, truly seeing extra potential in items that are usually tossed in the trash.
—•—•—

Think Outside the Store's artist Sarah Gingold [skgingold (at) gmail (dot) com] runs and hosts workshops in her Silver Spring, MD, studio. We're carrying tote bags and scarves she's made from goodies she saved OR bought from the SCRAPpy side of our store.

In addition, she and a friend have created Monkey Shorts birthday cards, featuring little characters they made, clothed, then posed, photographed and captioned with some hilarious comments. Come in and enjoy the whole set.
—•—•—

Redemption Glassworks takes used wine and water bottles and turns them into functional glassware. Then their proceeds from our sales go straight to GSI Haiti, a nonprofit that develops academic initiatives in rural Haiti. A bottle that's been cut in half is just plain cool, but don't take our word for it; see their designs -- etched and unetched -- for yourself.
—•—•—
Still more to come!


Thursday, December 20, 2012

SCRAP DC's Re:Boutique Opens!

After months of preparation, submissions from local artisans, the help of our dedicated volunteers, and -- in the end -- some SCRAPpy luck, we present DC's version of the Re:Boutique.


Modeled after the original, in Portland, OR, our collection gathers the work of 9 reuse artists who call Greater DC home. They repurpose everything from fabric, paper and glass to plaster remnants, computer components, even the magnetic tape inside a VHS cassette.

First up: creating our boutique. We've held two volunteer get-togethers to get this show on the road. At the first (with free pizza!), our team made quick work of carving out an empty space that was awfully hard to leave that way. Next, interior designer Victoria Popp donated her time (and outdated tile samples), and left us with some tremendous ideas -- some easily attainable, some that will definitely have to wait. We loved her suggestion to distinguish the boutique area from the rest by changing the wall color, accomplished at volunteer shin-dig #2, a painting party. What a nice and peppy red, from our very own stash of acrylic paints ($2 for a full pint).

Then came some furniture... miscues, we might call them. As with the exciting design ideas we don't currently have room for, we're tucking them away to be used at a later date, too. In the meantime, here we were, with extra furniture that didn't work, but where were items that would?

Well, here's where being scrappy = "da best"! A rack that was just sitting around AmericanEye, the Washington Design Center, was offered and now perfectly hugs our room's pillar (previously seen as being in our way). The base unit (not pictured) was less than $5 at Community Forklift, and with the cabinet door removed, it stores empty shopping bags and boutique surplus. The real coup is right above that at the center of our display: a 9-cubby piece someone left at our building's loading dock. It's perfect! After being bolted to the wall, it was outfitted with those tiles to make platforms of different heights. For the top, we put down a cork flooring sample from Amicus Green Building Center. Painted clementine boxes got some armchair "sleeves" that fit as just-right covers.

Time to fill it all in with our nice merchandise! We'll zoom in for a closer look at our artists' stuff as this Re:Boutique series of posts continues.

Tuesday, December 18, 2012

Our New Fan, A SCRAPpy Dressmaker

Recently we received these photos from Dressmaker/Fashion Designer Lena Savvoy (aleniafowlkes at yahoo dot com). They're such great examples of how to "renew" clothing that may have seen better days but still has some life in it. I thought we'd share them here and asked Lena to write up some text to accompany her work. She sent a sweet story detailing her career origins:

When I was 8-years old I asked my father for a needle and thread, and some fabric scraps to make my dolls some clothes. He was a little taken aback by my request, and he asked if I had ever made clothes for my dolls before. Of course! I had, and I showed him some of the more rudimentary items I had fashioned from headscarves, handkerchiefs and socks. Well my father was a naturally talented artist and painter, and he decided to challenge me to a contest. He got out Great Granny Katy’s big sewing tin that was full of ribbons, buttons, zippers and trim, and all the various remnants handed down through the generations. We each chose our materials and went into our separate rooms to see who could make the BEST skirt and jacket for my doll baby. Well, I knew there was absolutely no way he would win. First of all, it was my doll baby and he didn‘t play with doll babies - he was a ‘boy’. Anyway I was extra careful with my stitches, and I even put a little ribbon trim around my suit. It had buttons and button-holes, and there was no-way he was going beat me. Well when we were finally finished I was shocked! His suit was beautiful. He had chosen a beautiful fabric and a metallic-gold trim, but the best part was the elastic waist! How did he make an elastic waist from a box of scraps? He used a rubber band. My young mind exploded - and from that moment on, I knew that beautiful dresses could be made from almost anything!

These certainly are elegantly-rendered designs that show what "scraps" can become if you just use proper construction techniques and some imagination. At SCRAP DC, we think that's a winning formula whether you make clothes, home accents, or greeting cards (all of which, by the way, we now sell at our little Re:Boutique!).


Thanks for sharing these with us, Lena! And hey, blog readers! -- what do ya think? E-mail Lena if you've got a worn-out favorite that might be resuscitated, or let US know about other artists whose work you'd like featured here.

Thursday, November 15, 2012

Reuse is Sexy

I started on the creative reuse road a few years ago because I thought it was an amazing collision of things I love. It encourages stewardship of the earth, nurtures creativity, creates community, and on a more tangible level, gives me the high of finding a good deal. That list generally motivates me in the process of operating a creative reuse center, but sometimes I have my doubts. At the conference one of the speakers threw out the following stat in the first session: Garbage is only 1-2% of our environmental impact. I have yet to fact check that, however, it made me question how much of an environmental impact creative reuse really makes. I shared my doubts with a fellow conference goer while eating trail mix out in the hallway (yes, trail mix...we fully embraced our crunchy identity) and she reminded me that maybe our purpose in this whole movement of reuse is to be a catalyst, a culture changer, a voice in the desert crying “Reuse is Sexy!”.  

And there it was, the mantra for the rest of the conference. We dropped the word “sexy” like fifteen year old girls Googling Ryan Gosling pictures.  Even this very morning I received an email from a conference attendee who said she requested a t-shirt for Christmas saying “Reuse is Sexy”. And I can’t help but recognize the truth in the sentiment.  My interest level in a guy increases significantly if he tells me his entire outfit is thrifted and, of course, I want my house to look like your “Upcycled Home Decor” Pinterest board.  Even big retail stores use the sexiness of reuse to get people through their doors.  Urban Outfitters window displays--so cool. Anthropologie shabby chic dresses that look like something I could have made from pieces of fabric laying around the house, but didn’t have the time or the skills so I bought theirs for $200--sexy!  (Confession: I haven’t actually purchased a single thing from Anthropologie...I’m trying to channel people who do)

Maybe it’s the uniqueness we like about it or the cleverness, the ingenuity.  Perhaps it’s accomplishing the challenge of re-assembling the chaos of leftover materials back into some sort of stylish order. Or maybe it’s the greater characteristics behind reuse that are attractive: responsible, conscientious, resourceful, creative.  Whatever the reason, let us be silent no more.  We need to share widely that reuse is “in”. Our mission at SCRAP is to “inspire creative reuse and environmentally sustainable behavior”. That word “inspire” cuts right to the core. Let’s inspire people to rethink consumption, let’s tell them it’s not dorky to reuse, let’s close the cultural divide between what’s “green” and what’s “normal”.  Creative reuse centers do make an environmental impact. We divert literally TONS of materials from the waste stream every year.  But I think more than that we make an environmental impact through making a cultural impact.  We validate people in their choice to reuse and create a culture that celebrates reuse as a preferred way of consuming. We tell the world that reuse is sexy because it really is.

So who else wants a “Reuse is Sexy” t-shirt for Christmas? It just made my list.

Thursday, November 8, 2012

ReuseConex

At the end of October I attended the ReuseConex conference in Portland, Oregon.  It was organized by the Reuse Alliance and gathered together reusers across all the fields: creative reuse, thrift, deconstruction, multi-million reuse businesses, start-up reuse businesses, architectural salvage, etc. As I was the only one in the SCRAP DC circle able to attend I told them all I’d write about my experience and synthesize what I got out of the conference. It’s been 3 weeks and I have yet to do this. It’s not the usual excuse of being busy or being lazy. No, I haven’t done it because the significance of the 2 day conference left me with an inability to begin. How do I communicate the enormity of reuse and its implications in our society and in our lives? Because if I can sum up the conference in a nutshell, the nutshell is this: Reuse is huge and I know almost nothing about it.

So as all 20-somethings do when they have something to figure out and something to say I’m going to do a little blog series. The purpose is to explore the role of reuse in my life and in the world, to join in the greater conversation around reuse, and learn some things along the way. I don’t really do blogs so this might be a challenge, but someone recently reminded me that sharing is the way to make an impact. So I will share my explorations and hope that you share yours with me too. I'll try to keep this spicy and interesting because, seriously, the word reuse sounds kinda boring and I've already used it eleven times.

Next Up: Reuse is Sexy

Friday, November 2, 2012

A Busy November for DC!

SCRAP DC and so many of our friends are busy, busy, busy this month, with events going on all over town. If you can't make it to our programs, maybe you'll check out one of theirs! Here's a list:

The "Disposable Culture" Exhibit is up through 11/30 at the American Association for the Advancement of Science — see photos and sculptures that, even if they didn't address environmental issues, would still be gorgeous in and of themselves.

11/3 -- That's tomorrow!

  • We at SCRAP present a Candy Wrapper Crafts workshop at Montgomery County's ReStore in Gaithersburg, MD. Bring your saved-up wrappers from Halloween and we'll show you how to make some fun items for you to take home. If you haven't held onto those wrappers, are you sure you've been reading our blog? :^) Don't worry -- we'll have plenty on hand, too. $5, limit 20 people. Register here.
  • Our buddies in reuse at Community Forklift offer a FREE craft workshop; a bunch of deals on stuff with great creative potential; and they get their Green Gift Fair under way this weekend. Check them out!

11/10

  • We return to The Watkins Nature Center in PG County for their Trash to Treasure event. The whole day is free, mostly indoors, and full of cool vendors and other nonprofits. Shop "green" for the holidays, bring unwanted books to their Book Exchange, and try our SCRAPpy Make-it Take-it or make-your-own indigo dye cloth.


11/17

  • Both days of this weekend, the DIY unFaire is ON! It's inspired by the ever-more-popular Maker Faires, and our friends at Hac DC will be a part of the fun. Thanks to our neighbors on North Capitol Street, Fab Lab DC, for sharing that one!
Want to get more involved in the ways your community looks at "scrap"? Or: make sure your views on public art are heard. These groups have meetings coming up, and you're welcome to attend:

Sunday, October 28, 2012

For Your Halloween Party!

If you guys are looking to make some last second Halloween decorations from recycled materials, there's a plethora of ideas posted on our Pinterest account. 


I tried making this bat mobile. All you need is a stick from outside, black paper, and thread..


Mine didn't come out as awesome as the one on the Martha Stewart website but at least my cat hasn't knocked it down yet. 

Monday, October 22, 2012

Wallpaper Samples!

Here are a few things I made with some cool wallpaper samples from SCRAP DC:


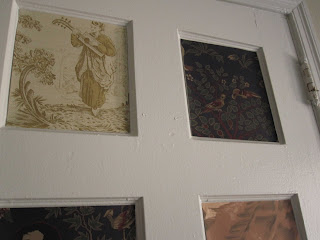
I decorated our door (patchwork style because samples are smallish and I can't decide anyways). I used wall putty to hang em up because we live in an apartment, so this is a good solution to personalizing a place that's temporary.


Here's a coupon/menu holder thing. I thought the rooster pattern was awesome for cheesy cliche kitchen decor but then I had an urge to make it functional in some way.


And a card holder! Those pesky rewards cards shall hog my wallet no more. There are tons of tutorials for this online (you can just google 'origami card holder', I saw one on youtube as well).


Friday, October 12, 2012

Easiest Do It Yourself Halloween Costumes


Here is a list of great DIY Halloween costume ideas that can hopefully be achieved with basic scrappy supplies like duck tape, bottles, cardboard, or whatever you have lying around. I've linked to photos of examples on our Pinterest (and you can click the photos for further tutorials on particular costumes). Disregard who is wearing them, these costumes could work for any age!

Keep in mind the easiest costumes to make are ones that allow you to use your own regular clothing for the majority of it. A black shirt and black pants go a long way for many DIY costumes! (This is especially the case when it comes to animal costumes.) Or if you're willing to make something slightly more complicated, cardboard boxes are often a good starting point for more ambitious costumes. 

Examples:

Bee- black tape on a yellow shirt for stripes or vice versa, with black pants, headband with pipe cleaners or wire
Ladybug- black shirt and pants for the body, cutout red posterboard with black spots for wings, pipe cleaner antannaes.
Butterfly-same black shirt/pant body but with fabric or paper wings
Shark-grey or blue hoodie and white felt
Bat-black pants/shirt with black fabric pinned under the arms for wings, and paper or fabric pointy ears glued to a headband
Poodle- white sweatpants and hoodie with lots of cottonballs!
Corpse Bride -a headband with shredded strips of white fabric, a white sheet for the dress. Or if you can get a cheap wedding dress from a thrift store tear it up!
Zombie- tear up any old clothes and mix up some fake blood with any recipe online
Owl- a paper mask and fabric wings
Super Mario- red shirt, overalls, hat
Rapunzel- yarn for braid, any girly dress 
Classic Skeleton- black pants and shirt with white duck tape or white paint
Raccoon- brown or black pants and shirt with a black mask, black felt on headband for ears, with a sock and ducktape for the tail
Pirate-a little vest from fabric with a fabric eye patch, a paper hat or classic bandana, a striped shirt underneath, and a paper tube roll for a cool telescope!
Medusa- fake snakes or maybe green pipe cleaners, a white sheet for a toga type dress/robe
Cat Lady-pin stuffed animal cats to an old dress!
Pilot- a cardboard box made into a plane and some goggles with a beanie and scarf
Train Conductor- another box around you type costume!
Robot- this is one that you could use basically anything glued to the cardboard box! bottlecaps and lids would make great beep boop buttons.
Spaceman- jetpack from bottles and some white snowpants with a rain jacket or white sweatshirt, a paper mache helmet or even a cut up bucket 
Knight- gray hoodie and sweatpants with a fabric tunic over it, a cardboard shield and sword
Little Red Riding Hood- a red fabric cape/hood over any little dress, a woven basket 


Adding personal touches to generic costumes is also a fun way to keep them unique. For example instead of being Spiderman or Captain America why not be your own superhero? Add designs to some brightly covered sweatpants and a cape and think of what your name and super powers would be. 

Or instead of being Harry Potter what kind of Hogwarts student would you be? Make a scarf of your house colors and customize your own cool wand.

These are just a few ideas, there are many many more out there! I've seen a lot of ones as obscure as a gumball machine to "spagetti and meatballs". The ones I've listed above are just my favorites because when given the opportunity to dress up, the feeling of actually being something is way more fun than being an inanimate object. (This is especially the case with kids, who like to play pretend year round anyways).

Enjoy making scrappy costumes and send us any pics of your handmade results!


Sunday, September 23, 2012

Reupholster an old chair

I found this awesome chair by the dumpster and needed to rescue it! Here's how I did a bit of a fix up on it:
(supplies needed: old chair, fabric, staple gun, scissors, batting/stuffing optional)


1. Figure out how the seat bottom is attached (these kinds of chairs are usually screwed down), and remove it. 

2. Cut some fabric slightly bigger than the seat, enough to be able to fold it over the top surface. Put some stuffing in between the fabric and seat if you would like some padding.

3. For this part just fold the fabric over the edges and staple it down, making sure the fabric is tight. I didn't have a staple gun so I hammered pins around the edge and glued it a little bit at a time. I wouldn't recommend this but if you're like me and don't feel like investing in a staple gun for one project, this will do it, but take longer.
Also- remember to leave marks or cuts so you can find the screw holes again.


Here's what it will look like when the fabric is attached:

 6. Re-screw the seat back in and you're done! I touched up the wood with a bit of acrylic craft paint, and of course I got the awesome fabric from Scrap DC (they have a lot to choose from).


Saturday, August 25, 2012

How To: Make a Frame Jewelry Holder


I've been seeing cool DIY jewleryholders on the internet and there are tons of things at Scrap to make one with! 

So here's a way to do it-

Supplies:
-scissors
-holey fabric (burlap) or wire mesh
-frames
-hot glue


1: Pick out an awesome frame. (I like the idea of having separate ones for earrings and necklaces but you can have them all on one big frame if you want.)


2: Cut the burlap to the edge of the frame.


3: If your frame is the wirehanger kind, just glue the burlap to the edge of the very back (leave the hanger wire exposed). But you'll need a main part to hang necklaces if this isn't just for earrings. I've seen all different solutions to this, such as lace ribbon, wire, or hooks. I'm gonna some wrap wire with yarn. Make a bend in the wire and hot glue it underneath the front edge of the frame like in the pics above.


4. If your frame doesn't have a wire just glue the burlap to the inside edge. That way you can hang it on a nail.


5. I found this (candle holder?) thingy that I'm gonna glue to the bottom and use as a tray. You never know what you'll find at Scrap so just get inspired by specific things you find!


And done! I use the jars for stud earrings because removing them would probably be a pain. Also clips make the necklaces easier to deal with. And you can put some cards and stuff on top if you have a thick frame! 

Wednesday, May 30, 2012

See the SCRAPpy Artists at Artomatic 2012


Artomatic is back in DC!

Have you been? This time around, over 1000 artists occupy 10 floors of a former office building in Crystal City, VA -- open and FREE Wednesdays through Sundays until June 23. Artists who replied to our e-mail seeking SCRAPpy works have our logo to display, and any one of them will gladly talk with you about why "reuse" beats "recycling." We're posting their booth numbers and web links so that you can take yourself on a "SCRAP tour" of Artomatic. We're likely missing some -- please make us aware if you catch more!

We're also offering a few workshops of our own, with guest instructors presenting a range of activities. See our events calendar for those details.


floor-booth name/Artomatic page - website
11-1170 Alayna Rasile - Alayna Rasile 
11-500 Alex Bako

We'll try to have more about these artists shortly, maybe even some interviews. In the meantime, go check them out, and please tell them SCRAP-DC sent you!

Tuesday, May 29, 2012

One of our recent shoppers, Valerie T., e-mailed ahead of her trip to verify that we'd have what she wanted to find: items that could become a photo-hanging "clothesline." Yep, we assured her, we have quite a few "scraps" that could be used in this way. For under $2, she bought a piece of rope, some large safety pins, and -- for backgrounds under each photo -- a couple of maps and some paper.

The finished product looks great and was enjoyed by those who attended the baby shower where they were displayed. The best part? When the event was over, this arrangement could be broken down for the safety pins and rope to be used again.


Buying the same items new might not cost much more than that $2 pricetag, but in many cases, you'd have to purchase more of each. By coming to us to shop, you can buy only what you need and give existing supplies a longer life.

Thanks for sharing, Valerie!

Wednesday, May 2, 2012

Julie gets SCRAPpy again


Julie H., who shared her previous projects with us in an earlier post, was kind enough to repeat this favor. She also lent us these objects to display at our recent event with Benevolent Media, the Eco Art + Design Depot, for Earth Day. Thanks, Julie! This stuff is even more fun than the last!

Corks Clock
I am always looking for new and fun ways to use wine corks and considering I can never drink as much wine as corks that I use, SCRAP-DC is the perfect place to pick up a handful (or three) [25¢/handful]. I found this wooden circle at a local thrift store (St. Albans on Wisconsin) for a few bucks and used some leftover paint, which was previously used to paint some furniture. The cool orange clock [hands] came from an old clock I had in college, which I completely forgot about until I was back home for a weekend and looking in my parents attic for fun things to fiddle with! After disassembly, something was needed to cover the clock machinery and luckily I found a circular cardboard box top that fit perfectly. I used a sharp razor blade (carefully) to cut the corks that were used for the Roman numerals X and V and used a hot glue gun for application. It is my new favorite wall décor!

Button Lamp! 
I am addicted to buttons. To me, they are not just the forgotten things on the underside of a shirt, but an important resource for arts and crafts! This project was so quick and simple! All you need is a handful of buttons [about 50¢ at Scrap-DC] and a lamp with lampshade (I found these at the Good Will, but there are always good finds on craigslist and at garage sales). I used white spray paint to give the buttons all the same look, but this is not a necessary step, especially if you have some really great colors you want to showcase! Use a hot glue gun and disperse buttons as you wish over the shade.


Jewelry Rack
Another thing I love to do with buttons is make earrings, and after I accrued 20 pairs of these, I needed something to hang them all on! I was inspired by my father’s key collection; he has kept every key he has had since he was a kid. No, I didn’t use his key collection. The base of the jewelry stand came from a hanger that I found in my closet, which was used to hold skirts and pants with those little hanger grip clips. I didn’t really use it anymore so I took the clips off and glued the keys to the hanger using a metal to metal epoxy. Lastly, a little white spray paint for the final touch!


Place Mat
Want another reason to lose a few pounds, you can use your old belts for arts and crafts! This project required a sewing machine, but only [used] simple stitches. The belts were all cut in half and then cut to be the same size. Make sure to sew up the edges because they will fray easily if not. Next, all the belts were sewn together using a wide stitch to make sure they are secured together. If you feel like you haven’t used all of the belt that you could have, you can use the belt buckle as a napkin ring as shown here!


Happy Birthday
In my last SCRAP-DC visit I found so much great fabric! Using the fabric and a hot glue gun I covered pieces of cardboard that were also purchased from SCRAP ("purchased" is a strong word, I feel like everything you can get there comes in at next to nothing!)


A little magic marker and a few kind words, you got yourself a card! 

Awesome stuff, Julie. We hope to see you again soon!

Tuesday, March 13, 2012

More projects to show off

Allison over at Liberty's Promise sent us these photos — kids made up some creatures as a "getting to know you" activity. They're fun & SCRAPpy!


We LOVE seeing what has become of our stuff once it leaves our store. Do you have projects you can share with us? Please do! Send photos and a short description to Karen or Heather [at] scrapdc.org.

Monday, February 20, 2012

Got a dollar and an hour?

Our most recent customer, Julie H., made all of these projects within an hour, and just after she left our store. Plus, as our title suggests, she spent less than a dollar for everything. Julie, thanks for shopping with us and then getting these pix our way, complete with descriptions:


I took a bunch of architectural samples [25¢/inch*] and instead of using the colored side, I used the really cool brown colored side to make some fun wall art. The samples were hot-glue-gunned to a box top that I also got at the scrap store, to make it look like it was done on canvas :)


I made a fun little mobile out of sheer fabric samples; it looks really great in front of the window with all of the sunlight shining in!


These buttons [5@25¢] were so cool! Such a great color to make some fun button earrings.


There were so many fun fabric samples [this size = 10¢] to choose from. Here I used a green fabric to re-cover a magnetic knife rack that was made out of old magnets and cardboard.


Amazing, Julie! Now, our "Iron Chef"-style event coming up 3/29 with Knowledge Commons DC isn't a timed competition (in fact, it's only a competition if you want it to be), but if someone wants to attempt more projects for even less money, we'll blog about that, too!

* What is meant by 1" of architectural samples? That's when you gather a bunch of samples together in a stack -- so imagine the above all chained together through the holes provided, like when you shop for countertops or paint colors and can flip through the "pages." When that stack is 1" tall, you've got a single unit assembled. And we'll charge you a total of ONE QUARTER for the whole thing. Come clear us out so we can make room for more.

Friday, February 3, 2012

A Papermaking Adventure


The finished product! Now the question is, what special project will I use this for?

The water is all pressed out. I added dried lavender to this one.

Gruel or paper pulp?

The beginning phase


As Karen and Heather know, I've had my share of car troubles this month. One weekend while stuck at home without a car and frustrated with just about every piece of technology around me, I decided to make paper, something I hadn't done since grade school.

Sifting through the internet, I found a lot of instructions and settled on this video that gave simple steps:


I followed the directions and my paper turned out well, although the texture and weight is very cardboard-y. Expect to use a lot of dishtowels, the pulp will hold a lot of water. It was also a bit tricky to lift the screen without another set of hands, but it's doable.

Get creative and add dried flowers or herbs, confetti, essential oils, glitter, or paper scraps!

Wednesday, February 1, 2012

Super Easy Lace Earrings


A few weeks ago Heather's friend Emily came into Scrap looking for some lace to make earrings. Using only glue(!) she made some fabulous jewelry, so easy I had to try it out.

All you need is lace trim or fabric and a mixture of equal parts Elmer's glue and water. Cut out the shapes you want for your earrings and paint on the glue mix. Squeeze out the excess liquid and let dry. Attach earring hooks, and that's it!

I wove some embroidery floss through my earrings when they dried to add a bit of color. You could also use the lace pieces in a necklace, bracelet, or anything else your crafty imagination can think of.